As I am writing the game, there are times I want to test something out in the game, but because of the nature of the game, getting to that state naturally will take some time. What I am doing is building in buffs that assist with that.
For example, I’m currently working on a lock, and the lock opens after some time. I can manually add a lock into the game and set it to a low time to open, but this is also an incentive to add a new buff to the game. Let’s make a buff that speeds up lock openings.
This does two things. First, it gives another stat that I can use. Now I can add more locks around the game world and make for more interesting interactions. Players have more control and can manage this. I can also make locks that take longer more dangerous because players have a way to offset that danger. Also, locks that are completed faster can give bigger rewards. Once again, because players can manipulate this.
Secondly, because I have the new stat, maybe I can use it for other lock-based mechanics. What else can this stat do? Right now it’s just for locks, but maybe it’s about manipulating other elements in the game that I’ve yet to design. I want to build in puzzles, so maybe this also gives more leeway in the time needed to defeat the puzzles. Maybe this is a general time state, and it allows us to modify anything that has a time component? I don’t know.
Basically, it lets us put more gameplay into the lock mechanic and add more depth to it because players have multiple ways to deal with it, and it opens the door to other non-lock uses.
I could have just dragged a lock into the scene and set it to a short timeout, but I find putting my solutions into the game opens up more doors.
In my head, I had picture guns circling the player, bullets firing from him. Each gun would be unique, and it would look cool. However, I also wanted you to have many guns shooting at once. You’re a robot after all, and you aren’t limited to two guns. When I added a second gun, it looked cool. To hand cannons each firing at its own target was pretty awesome. But when I added a third gun, it started looking messy. It started looking confusing. And I wanted you to carry even more weapons.
It occurred to me that as the player, you wouldn’t be paying attention to your guns. Rather, you’d be paying attention to the bullets and enemies around you. This meant that all those guns I was showing on screen were only useful for distracting you. Instead of having a clear understanding of where you were, there were these big guns spinning around you.
When I removed the visual representation of the guns, things became much easier to read on the screen. It was helped when I also gave the enemies their own unique bullets. Your bullets were blue, so you could see them, but they weren’t asking for your attention. The enemy’s bullets were brighter and they seemed larger. Now, instead of having too much going on, I could focus more on dodging and attacking.
Removing Assets and Work
The result of this is I won’t use gun assets in the game, it won’t fill up the scene, and as a result, I’ll probably not need to do as much work creating art for every gun. Instead, I can invest that time into creating the bullets you are firing, and coming up with more of them.
The real lesson to take away from this is to make sure that if something is on screen, it has to serve a purpose. The guns served no real purpose. You aren’t aiming your weapons, so you don’t need them to indicate where you are pointing. You are using all your weapons all the time, so you don’t need to see what you are holding at the moment. The only reason I added them was because you shoot from a gun, so obviously you’d have a gun. But we don’t need it in the game on screen.
So, I’m going to have to take a pass at everything I create and ask myself, what does this serve? And does it serve multiple purposes? Is it providing value? If it doesn’t, we should be able to remove it.
Enemy Colors
During this time, it also occurred to me that I should attend to the colors of the enemy. The squid monsters I have stand out, but the robots are blue. The same color as you. While I don’t necessarily think I need to change the robot’s color at this time, it made me think about camouflage. Enemies that are colored in certain ways can be hidden in plain sight. They don’t stand out. The key here is to know that you are doing that. And the enemies should still be easily distinguishable from a distance. The difference is that you aren’t drawing your attention to them. So while I’m not going to change anything now, as I design more enemies, I’ll do so with color in mind.
What does that mean? Visibility becomes an attribute. If an enemy has lots of strengths, making them easily seen is one weakness. If an enemy is relatively weak, with low health, and relies on sneaking up on you to do melee damage, making them less noticeable is one of their strengths. Again, the idea here isn’t to make the enemy invisible, only not to go out of my way to draw attention to them.
For people with color blindness, I’ll have to pay attention to what colors I pick, or at least handle this in color-blind modes, but that’s a long way off.
Playing with Shaders
I spent some time playing with shaders and built a simple app that lets me mess around with shaders. It was fun and reminded me it’s easy to build simple things like this in Godot. It helps me explore the different systems. The lesson here is to not be afraid to create new projects for the purpose of just exploring a certain aspect of the engine.
I released the project on GitHub. There are no expectations of anything. It’s merely there for testing purposes. However, you are free to explore and use it as you see fit.
Shaders are scary. Not really, but they are. Okay, if that sounds confusing, it’s the fact that with simple inputs, you can get some pretty crazy outputs. I am not an expert with shaders, but I want to use them. I know that they will help me create more special effects that I might otherwise not be able to create as easily or as nicely with just pixel art alone. And while I’m still not sure of the pixel art and shader aesthetic here, I don’t hate it.
That’s the shader used in the sample above. And while this isn’t going to be a shader tutorial, I want to go over some lessons I’ve already learned.
Split up your assets
The animated sprite is a single sprite sheet, and all the elements are combine. The circular body, the dangly bits, and the shadow below. In hindsight, I should have split them up into three separate animated sprites, and combine them all together into a single scene. This would have given me more control, and allowed me strategically place shaders where I wanted them.
This is why I have this check COLOR.r < 0.94 in the if statement. This checks the value of red. The arms have more red than the main body, and 0.94 is the cutoff. The shader won’t apply to those pixels. The same thing for the COLOR.a > 0.0 check. That is so nothing will be applied to transparent pixels.
If I had split up the body and the tentacles into separate sprites, I wouldn’t have had to make that check. I can still go back and fix that, and I probably will. But I wanted to share with you the lessons learned before I fixed it. I think it helps to show the process. Not just the end result. I did this, got this result, and this is where I need to improve. It wasn’t just a case of drawing the owl.
Add more inputs
Adding an input is fairly trivial. Inputs are denoted with uniform. In this case, I only have the noise being set. All the other numbers can have inputs. I’m going to go back and add in additional inputs for the COLOR modifications. It will look something like the following.
You can see by allowing us to change the inputs above, we can get different results. The below sample is using the inputs of mod_b: 0.5, mod_g: 2, and mod_r: 0.1. I can play around with this and get other results if I want. Maybe this is a poison effect? If I can abstract the shader out even more, I could probably make a generic poisoned shader if I wanted.
I still have a lot to learn in the shader department, but just working through this exercise has provided me with an incentive to learn more about them and how they work. It’s clear that it allows you to dramatically increase the look and feel of your game.
Reconsider how I design assets
Right now, I’m creating assets in Aseprite. And while this works great, it does have a downside. I have to create new assets for different colors. My goal now is to design things that make it easy to use shaders with. That way, I can create an asset once, and have a shader do the extra work of assigning it different colors. Now, I can have a single bullet, and if I want different damage types, I can simply apply a different shader.
This might seem obvious, but it’s not immediately apparent. Most pixel art tutorials and discussions are focused purely on the pixel art, and not the shader side of things. Understanding how to create good pixel art and how to make it easy to use shaders with it is not something I’ve seen anyone discuss (If it’s out there, please share!).
This also helps with color-blind modes. Because I can easily change the colors on the fly, I can work in color-blind support as needed. Rather than regenerate all the assets, I can easily pass in the corrections to the shaders. This isn’t something I’m going to concern myself with right now, but knowing that it can be done is reassuring.
Don’t be afraid of Shaders
No, really, don’t be afraid of them. Take it step by step. There are a lot of resources to learn about shaders in Godot. YouTube has lots of great tutorials, and don’t be afraid to practice. I’ll continue to explore and share.
The current codename for this game is xenod, Xeno Defense. This is a very early look at the game. There is still a lot to do, but I wanted to share this out to show progression. xenod is a roguelike set in space as you try to make your way back home.
Crafted Dynamic Levels
Crafted Dynamic Levels – Each level is the wreckage of a ship in space. You fly to these ships and salvage what you came from them. Because of this, I can design ships, and then randomize the interior. Think of it like this. Each ship is designed and build. Think of classes of ships. In Star Trek, you have the Constitution class, or the Galaxy class, or the Olympic class. Those are classes of ships. However, internally, they have different configurations. I design the class of the ship, and the randomized portion works with the various rooms and modules in the ship. This means you’ll recognize different types of ships, and you’ll have a good idea of the layouts, but you won’t know precisely where everything is internally.
I like this because it means you can learn the different types of ships and what that means for your excursion. Ship layouts will be different: some might have larger rooms, some might have many small rooms, some might have long corridors, others might have few to now corridors. The point is, different types of ships will provide different challenge. At the same time, different classes of ships serve different purposes. You might come across a class of ships that are used for scientific study, where as the next ship might be a warship. This makes a difference in where you go. Are you looking for more ammunition? You might look for a warship, or a military cargo ship.
How is this a roguelike?
There are several key elements that I’m focusing on, and it happens that it fits into the roguelike theme. First and foremost, let’s talk about permadeath.
xenod is build with permadeath in mind. You have one life. If you die, it’s over. However, you are generally not playing directly as your character. Rather, your character is sending a robot into the hostile derelict spacecraft to scavenge the supplies. Your robot can die, but that’s not you. If your robot fails, you get nothing. You lose the parts used to make the robot, and anything you weren’t able to recover. While you can rebuild robots, fail often enough and suddenly you are stuck out there. No fuel, no food, nothing. And you die. This isn’t meant to be a way around permadeath. Rather, it’s the gameplay I wanted, and it happens to fit into this category.
This also gives you resources to manage. You need to balance where you spend your resources. Upgrading your robot means they have a greater chance of survival and success, but it also means diverting resources that might make it easier to reach the wreckage you need to get the resources you want. That food you need to survive? It’s just out of reach, and if you’d improved your engine efficiency, maybe you would have reached it.
I didn’t set out to design a roguelike. However, as I’ve worked on the game, I find elements traditionally associated with roguelikes can help improve the game. In future posts, I’ll talk more about other design choices that are informed by roguelikes.
It looks like a bullet hell
Yes. One of the inspirations for the game was Vampire Survivors. I want crazy weapon combinations, and I want the player to enjoy that while they explore and scavenge the ship. They can focus on dodging enemies and attacks, and target things they need to retrieve. All the while, the robot targeting system does the work, and your arsenal of weapons fires away.
Initially the idea was to allow you to point to shoot, but I found it cumbersome. And if you were pointing to shoot, it meant you were focused on that, and not the other elements of the game. I wanted you to be focused on getting in, getting what you need, and getting out. I want you to loot. However, the idea of shooting waves of enemies is fun, too. And since it’s a robot you are piloting, the robot can use its AI to shoot at the enemy. You, as the controller, can focus on moving the robot around, setup turrets to defend, and find loot that needs to be taken back to the ship.
This doesn’t mean you can’t fight. Quite the contrary, your arsenal is strong, and because of that, sometimes you might focus on clearing out a room, but in that space, you are focused on dodging and getting the best angles on the enemy, avoiding attacks, and looting items that drop on the ground.
It might be interesting to allow you to customize your AI on your robot, to change how it targets and what it targets. Some weapons will just shoot everywhere, and some will target enemies. However, I’m not sure if I’m ready to commit to that. Is that an interesting thing? It might be. Part of planning your attack, but that also means knowing what you will see before you board. How will I share that information with you? While it’s one thing to know the layout of the ships, how will you learn what kind of enemies you will face, and whether you should set the AI for targeting fast enemies, or hard hitting enemies? I want to avoid having to spell things out. I’d rather show you things, rather than tell you things. And I’m not sure if I can do that right with the AI setup.
Anyways, this is my first post on the subject. I’ll post more as time goes on. I’m considering making videos. Maybe I can do that? We’ll see.
So much to say. I think the core lessons are: be patient, don’t give up, and always be learning. You can turn even the most crappy situation into valuable lessons. Teach them to others. Be happy with what you have yet always strive to improve things. Don’t let people flatter you into playing their games. When things get weird, keep a log. Love and respect good people. Learn to keep the assholes at a distance. Don’t get hung-up on the past. Be nice to people, even those trying to hurt you. Speak up when things are bad, and tell the truth. Trust your emotions yet check where they come from. Don’t be afraid of taking risks, and learn to identify and manage risks. Solve one problem at a time. Be generous. Teach others whenever you can. Remember Sturgeon’s Law.
So, we looked at JPEG image encoding, which is a very popular image codec. Especially since our image is going to be blurred heavily on the client, and thus band-limiting our image data, JPEG should compress this image quite efficiently for our purposes. Unfortunately, the standard JPEG header is hundreds of bytes in size. In fact, the JPEG header alone is several times bigger than our entire 200-byte budget. However, excluding the JPEG header, the encoded data payload itself was approaching our 200 bytes. We just needed to figure out what to do about that pesky header!
Given what I know of this person’s performance, and if it were my money, I would award this person the highest possible compensation increase and bonus.
Given what I know of this person’s performance, I would always want him or her on my team.
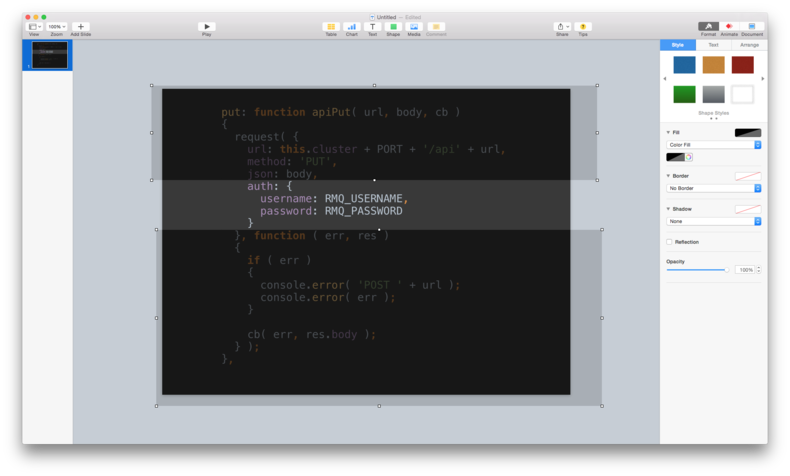
Before I started using this method, I always struggled with ways to highlight parts of code I wanted to talk about when giving presentations. This method, I’ve found, is at once the easiest method to employ, and provides context to the viewer. They can easily follow along, and where the code is in relation to other code you are talking about is made apparent.
A picture is worth a thousand words, and this one should show clearly how to highlight lines of code on a slide. You just add two shapes, and set the opacity to such a level that code can still be viewed, but it’s dimmed out.
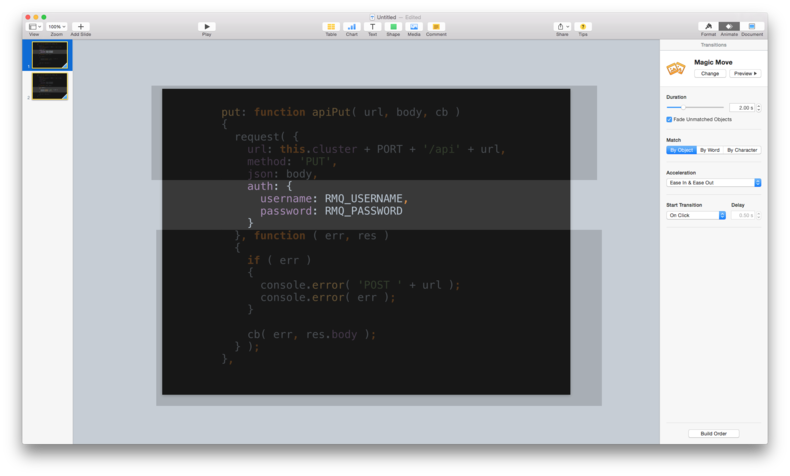
You can also generate nice transitions between highlights of the same code using Magic Move as your transition.
The result is a fairly simple transition as you highlight specific lines of code.
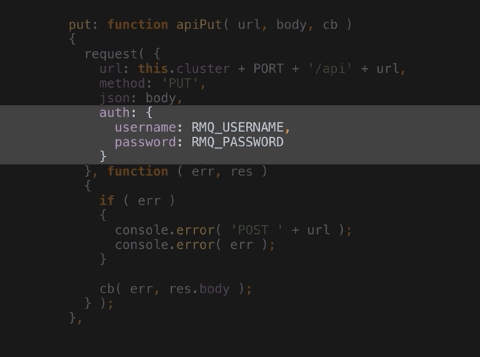
This works with code that cannot fit on your slide as well. Simple add the code to your slide, and allow it to go beyond the edge of your slide. When you want to highlight code that is partially hidden, simply move the text box up as appropriate.
While my examples use Keynote, the technique can be applied in other presentation software using their own appropriate features.
Practice your talk before speaking. Several times. Record yourself. Watch it. At a conference, people paid $$$ for this.
Assume wifi is unavailable for your talk. Don’t depend on it to run demos.
Assume you’ll get few or no questions. Given a 45 minute slot? Aim for 40 minutes.
If you insist on live coding, make sure you’ve written down the code ahead of time. We don’t want to watch you debug in real time.
If your talk title says it’s about X, don’t make the first quarter/half not talking about X. We probably came to listen to you talk about X, not your life story. Exceptions exist, but do so carefully.
Waiting for audience participation is awkward. “Can anyone see what’s wrong?” Just move on.
The best slides are ones that are useful after the talk. You can export with speaker notes! Have speaker notes!
Be professional. Know how your computer works. How the presentation software works. Show up ahead of time, make sure tech is ready.
Don’t save your talk for a big conference. Run through it at a user group or meetup. Adjust. Improve. Repeat.
You can’t please everyone. Present for a target audience. Title and description should aim to entice that target audience.